Navigate:
The act or task of moving through a place or along a route, to make one’s way over or through traverse. Navigate.[1]ORIGIN: late 16th century (in the sense ‘travel in a ship’): from Latin navigat- ‘sailed’, from the verb navigare, from navis ‘ship’ + agere ‘drive’. [2]NAVIGATE | Definition of NAVIGATE by Oxford Dictionary on Lexico.com also meaning of NAVIGATE
To navigate through the outdoors, one must first learn how to read a topographic map. Fortunately, it doesn’t require any special skills to learn how to read such a map. Once you become familiar with the intricacies of maps, reading them will become second nature. Being able to interpret the lines and symbols on a map can greatly enhance your trip planning. Recognizing the different features on a map can also help you identify your location more accurately, which in turn can aid in navigation. These features can be described in detail on the map and help provide a better understanding of the landscape, making it easier to navigate.
It’s important to remember that reading and understanding a map is only one part of navigating. To be able to navigate to your desired location, it’s essential to use a compass alongside the map. While many electronic devices can help enhance your ability to navigate, they should never replace your map and compass or your ability to use them. It’s worth keeping in mind that batteries can die and electronics can fail, but as long as you have your map and compass, you have the tools necessary to stay found and reach your destination.
Map Symbols and Colors help you Navigate
Red: is overprinted to highlight primary and secondary roads; it also designates surveying features associated with public land surveys.
| Township or Range Line | Land Grant or Mining Claim | ||
| Fence Line | Route Markers |
Black: represents non-natural features.
| Divided Highway | Primary Highway | ||
| Secondary Highway | Light Duty Road | ||
| Unimproved Road (Dirt/Gravel) | Trail | ||
| Railroad – Multiple Tracks | Railroad – Single Track | ||
| Bridge | Drawbridge | ||
| Footbridge | Tunnel | ||
| Overpass – Underpass | Dwelling | ||
| School | Church | ||
| Airport | Landmark | ||
| Campground | Picnic Area | ||
| Cemetery: Small / Large | Power Lines | ||
| National Boundary | State Boundary | ||
| City Boundary | National Park or Forest Boundary | ||
| Quarry / Open Pit Mine | Cave or Mine Entrance | ||
| Landmark Line (Labeled as to Type) | Windmill |
Blue: represents water features.
| Lake | Glacier Contour Lines | ||
| Stream | River | ||
| Intermittent Stream | Disappearing Stream | ||
| Small Falls | Small Rapids | ||
| Large Falls | Large Rapids | ||
| Dam with Lock | Canal with Lock | ||
| Large Dam | Small Dam: Masonry, Earth | ||
| Water Well | Spring | ||
| Marsh or Swamp |
Brown: represents contour lines and elevation markers.
| Index Contour Lines | Intermediate Contour Lines | ||
| Supplementary Contour Lines | Depression Contour | ||
| Road Fork Sector Corner with Elevation | |||
Green: represents vegetation features
| Woods | Orchard | ||
| Scrub | Sparse |
Purple: revisions made by areal photography.
| Landmark, Campground, Dwelling |
Reading Topographical Maps to help Navigate
To navigate the terrain with the help of a map, it is important to understand what the map is trying to convey. The thin brown lines that are present on a topographical map are called contour lines. These lines represent known equal elevations. If you were to navigate along a contour line, you would neither climb nor descend. You would ultimately end up where you started if you followed it around long enough. The scale of the map determines the variation in contour intervals. For instance, on a 7.5-minute quadrangle, the scale is 1:24,000 (1 inch equals 24,000 inches), and the intervals are usually 40 feet apart unless specified otherwise.
Map Interpretation
When interpreting a topographical map, it requires some imagination. Essentially, when you look at a map, you are looking down at the terrain from above. You have to translate the lines and squiggles into ridges and valleys. If you take a look at the image on the left (Figure 1), you can imagine a small building next to a little hill (Figure 2 and Figure 3).
| Figure 1 |
Figure 2 |
Figure 3 |
Figure 4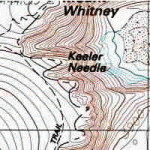 |
Contour Lines
It is important to understand how to read contour lines on a map to determine the steepness of the terrain. The wider the space between the contour lines, the gentler the slope. Conversely, the closer the contour lines are, the steeper the slope. When contour lines intersect, it indicates a cliff. For instance, if you look at Mount Whitney – Keeler Needle Quadrangle (Figure 4), you will notice that the contour lines on the east side of the mountain are very steep, while those on the west side are less steep.
Whether you are traveling cross-country or on a trail, being able to read a map is crucial to determine whether you will be navigating in open, flat terrain or steep incline. This is particularly significant when you navigate cross-country. You would want to avoid cliffs and try to bypass steep terrain.
Ridges and Valleys
To read topographical maps effectively, it’s essential to pay attention to the shape of the contour lines. The contour lines form V’s and U’s, which indicate valleys and ridges respectively. The key to differentiating between the two is to determine the direction in which the V’s or U’s point. If the bases of the V’s or U’s are facing uphill, then you’re looking at a valley. On the other hand, if the V’s or U’s point downhill, it represents a ridge. For instance, in Figure 4, the V’s between Mount Whitney and Keeler’s Needle point uphill, indicating a valley or couloir. The V’s pointing off the right side of the figure below Keeler Needle are pointing downhill, representing a ridge.
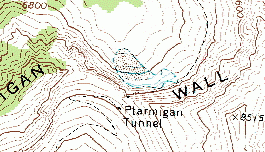
Figure 5
To distinguish between ridges and valleys, it is common for valleys to have rivers or streams, but not always. A helpful way to identify passes where ridges and valleys meet is by observing that V’s pointing downhill represents ridges, while U’s pointing uphill represents valleys. Figure 5 illustrates how the V’s pointing downhill from peak x8515 meet the V’s from the opposite direction to form a pass. The U’s, with their bases going uphill, indicate the terrain descending north and south from the pass. The dashed line, which is a trail, approaches the pass from the north and traverses the base of a steep wall (close contours) above a glacier (blue contours). The Ptarmigan Tunnel cuts through the pass in this instance, and then the trail switchbacks and descends into the valley to the south.
Declination
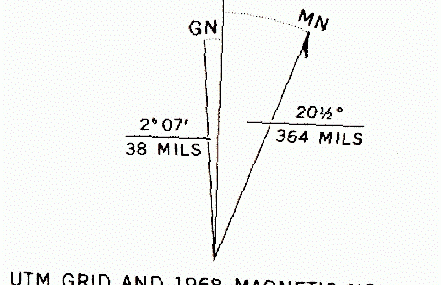
Figure 6
When it comes to reading topographical maps, it’s important to take into account the declination. Ignoring it can lead you off course when navigating with a compass. On most maps, you’ll find a V in the lower left-hand corner, which indicates the difference between True North and Magnetic North. All features on the map are aligned to True North. If you disregard the declination information, you will follow the red needle in your compass and end up off course by 20½° (as shown in Figure 6).
Depending on the distance you’re navigating, you could miss your objective entirely. depending on where you are in the world, declination is either east or west. In Figure 6, the declination is 20½° east. The Magnetic North (MN) is east of True North in this example. With East declination, to find your true course subtract 20½° from the track. An easy memory aid is “East is least, West is best”. Subtract East declinations and add West declinations to change from True North to Magnetic North.
Cross-Country Travel
It’s important to keep in mind that declination is subject to change. Therefore, before you set out to navigate, especially if you’re going cross-country, ensure that your map is up to date. For instance, the declination in Montana was 20 1/2 degrees east in 1968, but newer maps with an updated declination of the same area in 2011 show only 14.6 degrees east. Although you may not notice a 6-degree error over short distances, it could cause you to miss your destination by a significant distance if you had to navigate several miles. One way to ensure that you reach your destination is by using an intentional offset, which is described later.
Compass Anatomy
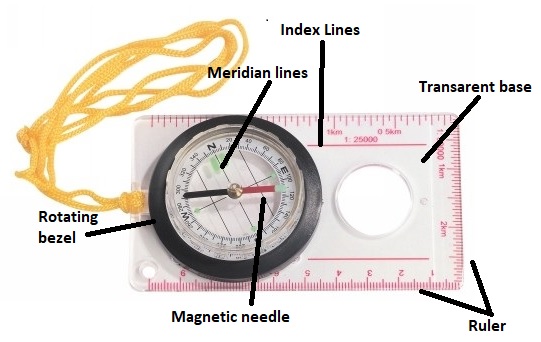
Before illustrating the application of declination, let’s view the anatomy of a simple compass (Figure 7). Most compasses have a see-thru or transparent base so you can see the map beneath the compass. There are Index lines to help line the compass alone routes or orientation lines on maps. The rotating bezel allows the alignment of the meridian lines (lines within the bezel) to either True North or Magnetic North reference lines. The magnetic needle points north and uses the ruler on the edges to measure distances.
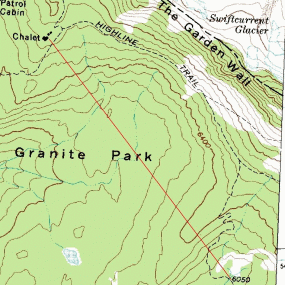
Figure 8
To help illustrate the problem of declination while you try to navigate, look at Figure 8. You are planning to hike cross-country across Granite Park from altitude mark 6050 on the Highline Trail to the Chalet. Opening up the map, you mark the route. Using a compass, compute the direction from point 6050 to the Chalet. To do this place the side of the compass along the drawn route, rotate the bezel of the compass until it points to the top of the map and the meridian lines are parallel with north reference lines. On the plate of the compass, in the center, extending from the bezel is an arrow. Read the direction on the bezel, 320° opposite the arrow. Knowing that the declination in this area is 20½° east when leaving point 6050, the correct course would be 300°. (320° – 20° = 300°)
Triangulation
The other time declination comes into play is by trying to triangulate your exact location with the surrounding terrain and your map and compass. The art of pinpointing your position relies on
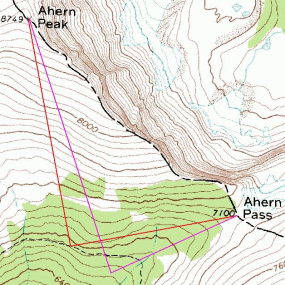
Figure 9
knowledge of declination. Somewhere on the Highline trail, holding the compass and pointing towards Ahern Peak, rotate the bezel until North is in line with the magnetic arrow and read the heading to Ahern Peak. 330°. Doing the same with Ahern Pass. 60°.
Knowing that the declination is 20 ½° east and the readings just taken are magnetic; they must be changed into true bearings. 330° +20° = 350° and 60° + 20° = 80°. The process is the opposite of True North to Magnetic North. Instead of subtracting for East and adding for West, add for East and subtract for West.
On the compass, rotate the bezel until the arrow on the base is lined up with 350°. Place the compass with the edge on Ahern Peak and rotate the compass around until the north arrow on the bezel is parallel with the side of the map or north reference lines. Draw a line along the edge of the compass. Once this is done, rotate the bezel of the compass until 80° is aligned with the arrow on the base and go through the same process from Ahern Pass. (See the red line in Figure 9). Where the two lines intercept is your location. If the declination was ignored (see the magenta line in Figure 9) you would triangulate your position incorrectly and conclude that the map was incorrect because the trail you are standing on looks like it should be drawn further south on the map.
Navigate Technique
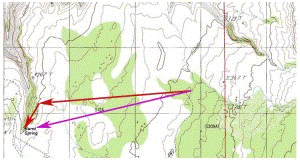
Figure 10
When you want to navigate to a certain point a good technique is to use an intentional offset. First of all, determine what direction your destination is. Next, you offset an error in one direction or the other. Looking at Figure 10 for example, you are at the end of the 4-wheel drive track and want to travel to Burnt Springs. Calculating your direction to navigate (magenta arrow) you calculate a heading of 235 degrees. If you navigate on a heading of 245 degrees, an offset to the right 10 degrees when you reach the ravine you will be north of the spring.
Turn left and follow the ravine south to the spring. If you navigate on a heading of 235 degrees but drift south a little you could pass the spring without knowing it until you come to the dirt road. Now you would have to triangulate your position and navigate to the spring from this new location.
Trip Planning
Finally, when you are planning a trip and studying your route, you can estimate how long it will take to navigate the planned route. The average pace of a hiker with a full pack is 2 to 3 miles an hour, If you are climbing or descending it will take you longer than if on level ground. Therefore, let’s say we are planning a hike from Longs Peak Ranger Station to the Boulder Field (Figure 11).
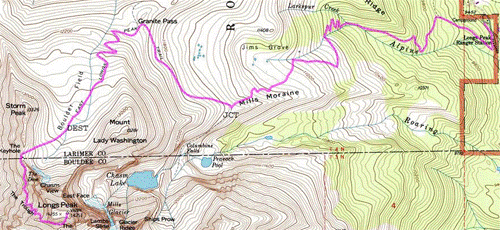
Looking at this route(marked in magenta) measure the distance that you will travel by using a piece of string by tracing the route. Then compare its length with the scale at the bottom of the map. We computed 5.6 miles. Next, since this route is all uphill, we just need our starting elevation, 9360, and our finishing elevation, 12720. To find these two altitudes we notice that the heavy contour line near the ranger station is 9400 feet. The parking lot appears to be one contour line less; the chart key shows that each contour line is 40 feet. 9400 – 40 = 9360. The same method is used for the boulder field. The heavy contour line is 12800 feet. The destination is two contour lines less, 12800 – 80 = 12720.
Trip Estimation formula
The total altitude gain is 3360 feet (12720 – 9360 = 3360). To compute your time take your total distance (TD) and divide it by your average miles per hour (MPH) that you travel on level ground. Add to this your total altitude gain (AG) divided by 500 and multiply by 50%, if there is downhill travel take your total altitude loss (AL) and divide it by 1000 and multiply that by 25%. Your formula looks like this: TD/MPH + (AG/500 * .5) + AL/1000 * .25) = hours. Use our Hiking Time Calculator for easy estimating your travel time.
Armed with this information we can compute how long our day will be. 5.6miles/3 mph = 1.8667 hours (3360/500 * .5) = 3.36 hours. There isn’t any significant altitude loss on the route so we just add these two times together. 1.8667 + 3.36 = 5.2267. Rounding the number to two decimal places computes our estimated time to navigate this trail at 5.23 hours. Remember this is just an estimate to give you an idea of how long the hike will take.
For a more accurate estimate, use a mapping program such as Garmin BaseCamp, Delorme Topo, or even Google Map with or without a Topo overlay. Using a computer program that allows you to plot your trip will give you all the information you need for the Hiking Time Calculator. These programs will give you your distance, Altitude gain, and loss. Input these into the Calculator with your hiking speed. Then calculator will have an estimate of how long your hike will take.
References
| ↑1 | ORIGIN: late 16th century (in the sense ‘travel in a ship’): from Latin navigat- ‘sailed’, from the verb navigare, from navis ‘ship’ + agere ‘drive’. |
|---|---|
| ↑2 | NAVIGATE | Definition of NAVIGATE by Oxford Dictionary on Lexico.com also meaning of NAVIGATE |